- Download the vSphere client as discussed in the Big Data Lab Setup.
- Login to the vSphere Hypervisor using the client using the root username and password which you used to install the vSphere Hypervisor.


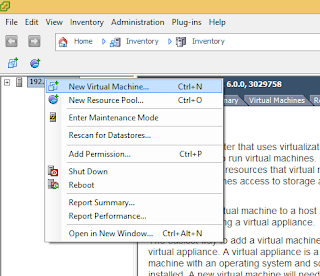
3.Right click on the server and select create new virtual machine

4. Select the Typical configuration on the Create New Virtual Machine Popup

5. Give a name for the virtual machine

6. Select storage and size.

7. Select Guest Operating System. From the Guest Operating System select Linux and from the versions select the Cent OS 4/5/6/7 (64 bit)

8. Select Network
This would be the default. We would look at how to connect this network card to the external network when we setup the network settings for the ESXi Server.

9. Create a Virtual Disk. Select a disk size depending on the storage amount. We can always come back and add more disk space if we run out of it

10. Select Ready to complete. Make sure that you check box the "edit the virtual machine before completion" so that we can change some default settings.
11. Change the Memory to 4 GB

12. Change the CPU Cores

13. Attached a CentOS7 iso for installation to the CD ROM drive, enable the "connect on power on" and select the CentOS7 iso on the radio button "Datastore ISO File".

14. Start the VM. Go back to the vSphere client and start the VM

15. Launch the Virtual Machine Console to install the CentOS which would be done in the next blog. Select the VM that we created and then click on the computer icon with the arrow.


5. Give a name for the virtual machine

6. Select storage and size.

7. Select Guest Operating System. From the Guest Operating System select Linux and from the versions select the Cent OS 4/5/6/7 (64 bit)

8. Select Network
This would be the default. We would look at how to connect this network card to the external network when we setup the network settings for the ESXi Server.

9. Create a Virtual Disk. Select a disk size depending on the storage amount. We can always come back and add more disk space if we run out of it

10. Select Ready to complete. Make sure that you check box the "edit the virtual machine before completion" so that we can change some default settings.

11. Change the Memory to 4 GB

12. Change the CPU Cores

13. Attached a CentOS7 iso for installation to the CD ROM drive, enable the "connect on power on" and select the CentOS7 iso on the radio button "Datastore ISO File".

14. Start the VM. Go back to the vSphere client and start the VM

15. Launch the Virtual Machine Console to install the CentOS which would be done in the next blog. Select the VM that we created and then click on the computer icon with the arrow.

No comments:
Post a Comment