Content

Tuesday, December 29, 2015

OS X ability to open multiple Eclipse Mars workspace instances on Mac

By default only one instance of Eclipse can be opened in Mac.

In order to open multiple instance do the following.

1. On Eclipse Mars click on Help -> Eclipse Marketplace
2. On the file text box enter "OS X eclipse launcher" and click go
3. Install the plugin
more info from  
http://marketplace.eclipse.org/content/os-x-eclipse-launcher?mpc=true&mpc_state=
As of today the version is OS X eclipse launcher 3.0

After installing restart eclipse.
1. Click on File Menu
2. You should now have an "Open Workspace" menu link which would allow you to launch multiple Eclipse instances

Saturday, November 7, 2015

Linux Class Overview

Unlike the Microsoft world where there is only one OS untill a new version comes and replaces it; in the open source world there are many OSes. Though this topic can span multiple pages, I would like to keep it short.. The mother of all OS is Unix, which according to many is only for geeks or scientist so a simpler flavor with UI was created and named as Linux. As with all open source there is no one owner of this OS, each vendor or community would create its own version of Linux, these are callled flavors. Few of the flavors are Ubuntu, CentOS, Suse, Redhat, Debian, OS X and so on. These in-turn have its own versions.

Few of the Linux commands are common across all these OS while some are not. In the Big Data School anything that is common is put in the OS-Linux Class while the specific OS lesson are put under OS Version Class. 

Using putty to connect to a remote linux box CentOS7 or Ubuntu 14.04.3 LTS

As explained in the previous post, the center of the open source server interaction client would revolve around the console.

The popular console that existing for Windows users is putty. Its currently available only on 32 bit mode but this is good enough.

1. Download putty.
2. Double click to open it.
3. On the putty configuration enter the IP address for the host name, leave the default SSH port 22.
You should also give a name for the Saved Sessions and click on the "Save" button so that you don't have to type this information again and again. Next it you can select from the saved list and then click on Load.


4.Click on the open to enter the console


5. Enter the username and password to connect to the server


Where is my remote desktop in open source world?

Well, in the Microsoft world we are spoiled, the server is not the place to have a UI, say goodbye to your UI and mouse skills, learn to live with the command line world and master this skill as fast as you can. No more UI or mouse when interacting with servers, everything should be done using the console. The most popular console in Windows world is putty and the most popular text editor is the vi editor. These are simple by powerful so learn these as fast as you can.

How to setup a CentOS 7 Virtual Machine using VMWare vSphere 6 client?


  1. Download the vSphere client as discussed in the Big Data Lab Setup.
  2. Login to the vSphere Hypervisor using the client using the root username and password which you used to install the vSphere Hypervisor.


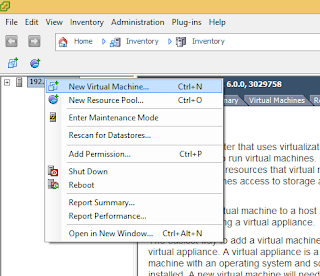
3.Right click on the server and select create new virtual machine

4. Select the Typical configuration on the Create New Virtual Machine Popup


5. Give a name for the virtual machine


6. Select storage and size.


7. Select Guest Operating System. From the Guest Operating System select Linux and from the versions select the Cent OS 4/5/6/7 (64 bit)


8. Select Network
This would be the default. We would look at how to connect this network card to the external network when we setup the network settings for the ESXi Server.


9. Create a Virtual Disk. Select a disk size depending on the storage amount. We can always come back and add more  disk space if we run out of it


10. Select Ready to complete. Make sure that you check box the "edit the virtual machine before completion" so that we can change some default settings.


11. Change the Memory to 4 GB


12. Change the CPU Cores


13. Attached a CentOS7 iso for installation to the CD ROM drive, enable the "connect on power on" and select the CentOS7 iso on the radio button "Datastore ISO File".


14. Start the VM. Go back to the vSphere client and start the VM


15. Launch the Virtual Machine Console to install the CentOS which would be done in the next blog. Select the VM that we created and then click on the computer icon with the arrow.

Wednesday, October 28, 2015

How to create a user, group and enable him to do what a super user can in CentOS7?

As with all OS, we first need to make sure that we can create users. The users are of two types.

  1. Super Users (Administrators in Windows World)
  2. All configurations should be done using this account.
  3. Normal Users
  4. All services, development, browsing should be done using this account.

It's a best practice to not do any development with the root user and have separate account that can be a Super User and another account that can do the normal services or development work.

When a task needs to be done that requires the super user privileges we switch between a super user and the normal user and then switch back to the normal user. Always work with the normal user. Note this concept is new for Windows Users. This is similar to the run as but within the same window you can keep switching users to perform tasks with the corresponding privileges.

When you installed CentOS 7 it would expect you to have the root user and its password. You need to know this before you can create these types of users.

Creating a Super User using SSH Terminal
  1. Using putty SSH into the CentOS 7 Server using root credentials
  2. Since you are the root you can give the following command to create the admin user and add him to the root group
  3. 
    useradd -g root bigdataadmin
    
    
  4. Now we need to change the password
  5. 
    passwd bigdataadmin
    
    
    Give a strong password.
  6. In order for this user to switch to a super user to perform task the require super user privileges we need to give permission. This is done by using
  7. 
    gpasswd -a bigdataadmin wheel
    
    
Creating a Normal User using SSH Terminal
  1. Using putty SSH into the CentOS 7 Server using the previously created "bigdataadmin" user
  2. Since this time you are not the root you need to use the following to create the user and the group. Note the use of sudo in front of the command. This stands for "super user do"
  3. First create the group
  4. 
    sudo groupadd bigdatagroup
    
    
    It would prompt for a password, enter the password created in the previous step.
  5. Create the user
  6. 
    sudo useradd -g bigdatagroup bigdatauser
    
    
  7. Change the password
  8. 
    sudo passwd bigdatauser


Note: As with all articles, Open source technologies are sometimes not backward compatible, please check the version number before following this lesson or any lesson on this site.


Thursday, October 22, 2015

Big Data Lab Setup

Now that we are ready to start, first we need machines, since we can't have many machines at home or office, we need to rely on the virtual machines. There is another concept of dockers which we would explorer later.

So figure out if you have some PC either new or old or be nice to your manager and try to obtain an old server in the office that you can use to create the Virtual Machines.

The lab setup would be done using VSphere Hypervisor. This is a free version and does not come with any UI. Sign up and install it on the box. The version as of this date is VMWare vSphere 6 Hypervisor version VMWare ESXi, 6.0.0, 3029758

The client for creating the VM is done using the vSphere Client. Download this and connect to your server from any other laptop or desktop with a UI. The version as of this date is vSphere Client version 6.0.0 Build 3016447.

If you already have the machines skip this class.